by Phiggle
It's about time I posted the version of that overlay guide I was reworking! Here it is, and let me know if there are any problems or some other topics that ought to get covered.
Getting started with adding images, animations, and other clips on top of your video using Avisynth
If you want to do any of the following with Avisynth:
- Splice an image into the middle of your clip
- Overlay an image on top of a clip
- Make that overlay apply over only a certain length of time
- Move images around on top of your video
- String several images together to make a frame-by-frame animation, that you can then move around on top of your video
This guide has what you need to get started!
Introduction[]
Avisynth is a pretty powerful tool for processing your videos (as you well know, because you surely have read Vicas' tutorial already). Once you've got the basics down, you can start getting creative. This is a guide to one of my favorite ways: adding external images overlaid on the video.
First, take a look at this example video:
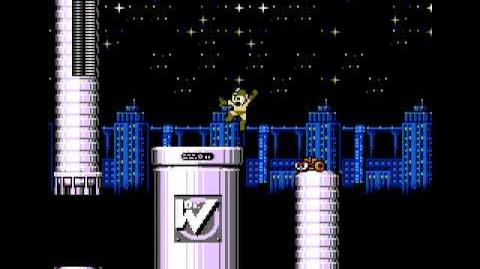
Of course, Dr. Light eating Mega Man was never there, neither were those Quickman lasers, or any of those other visual gags. (There were other edits too, like the sounds, but they're not covered in this guide.) All it took to do these were some work in your image editor of choice (I used GIMP) to make the sprites into image files and some lines of Avisynth to grab the image file and put it on top of the raw video.
I'll go over a few methods of doing this in this tutorial, but the idea behind them all is an overlay, which is also explained in Vicas' guide and elsewhere. This will cover whole-video overlays with the Layer function, overlays over a specific group of frames using Layer along with Trims and/or the ApplyRange function, moving overlays using the Animate function, and writing up custom functions that can do it all while saving some time and effort. (And be ready! Time and effort are major parts of this process - but it can be quite entertaining when you do it right.) I definitely can't say that these are the best ways to go about these edits, but it'll get you started with the concepts. This guide came out of sprite edits to videos from the Rockman Minimum/Exhaust LPs, which you might care about for context but otherwise aren't necessary for the guide: Rockman Exhaust and Minimum
Away we go!
Step 1 - Creating the images you want to add, and bringing them into Avisynth[]
Probably the most important thing to know about images in Avisynth is that they get treated the same way as video clips. If you're familiar with AviSource(), DirectShowSource(), or other similar functions, you'll be happy to know this: You can just use ImageSource() (rundown here on the Avisynth wiki) to import images into your Avisynth script.
Here are a couple of examples, depending on if your image is in the same directory as your script or not:
ImageSource("C:\filepath\doctorlight.png")
ImageSource("doctorwily.png", pixel_type="RGB32", fps=30)
Important ImageSource facts:
The pixel_type of RGB32 here is especially important when you have an image with some transparency that you want to preserve. If you omit the pixel_type, you might for example see a big monochrome box around your image where the transparency is supposed to be. Also, in most cases your image will default to lasting 1000 frames. You can change that in a couple of ways, like adding the start and end parameters to ImageSource, or by using Trims or Loops. If you want your image to last forever, here's a good way to do it:
doctorlight=ImageSource("C:\filepath\doctorlight.png")
doctorlight=doctorlight.Loop(-1)
When you're doing overlays, you can overlay any clip. That could mean a single still image, like a map of the area, enemy sprite, a watermark (don't do this), or whatever else. It could also be another video or clip for a picture-in-picture effect or to fully replace the main video you're working with. One favorite trick of mine is a string of images spliced together to make an animation that can then move around on the screen, like with these two images here:
![]()
![]()
Let's combine them into a single looping clip. We can splice them together like any other clip, because all their properties like width and height match. We'll go over the importance of this later on.
wily1=ImageSource("wily1.png", pixel_type="RGB32", fps=30)
wily2=ImageSource("wily2.png", pixel_type="RGB32", fps=30)
wily=wily1.Trim(0,-5)+wily2.Trim(0,-5) #fiddle with trim lengths to change the tempo of the animation
wily=wily.Loop(-1) #the -1 means it loops forever
This gives you a single clip, wily:
![]()
that, like the other examples, you can work with like any other video clip. The point is, you can layer in just about any clip, as long as you know how to use the right functions.
There's another way to do this too: say you have a series of images that are frames of animation, meant to last the same length of time - as you would if you took individual still frames from a video clip and made them into image files. I believe Irfanview has a function like this, and Wily above is also potentially an example, since we want those images to last an equal number of frames. If you have them named in the right format, like wily01.png through wily99.png, or wily0001 up to wily9999, you can automatically make them into a single clip, then give them the same framerate as your video, by using ImageSource as follows:
#for wily1.png through wily2.png
wily=ImageSource("wily%d.png", pixel_type="RGB32", fps=2, start=1, end=2)
wily = wily.ChangeFPS(video.FrameRate())
#for wily01.png through wily22.png
wily=ImageSource("wily%02d.png", pixel_type="RGB32", fps=2, start=1, end=22)
wily = wily.ChangeFPS(video.FrameRate())
#for wily0001.png through wily0555.png
wily=ImageSource("wily%04d.png", pixel_type="RGB32", fps=2, start=1, end=555)
wily = wily.ChangeFPS(video.FrameRate())
You can see that the main differences in the ImageSource lines are the number coming after Wily -- 02 means it is a two-digit zero-padded number (01-99), 04 means it's a 4-digit zero-padded number (0001-9999), and no number means it's just 1-9 at the most with no leading zeroes. Thanks Xenoveritas for the tip!
Step 2 - Adding the images to the movie[]
Pretty much all my scripts start with something like:
video=AVISource("C:\filepath\raw-video-from-game.avi")
hilariousimage1=ImageSource("C:\filepath\image1.png", fps=60, pixel_type="RGB32")
hilariousimage2=ImageSource("C:\filepath\image2.png", fps=60, pixel_type="RGB32")
...
You can add in the ImageSource lines for any other sprites that are going to get used here too. You can do it here or later in the script, as long as you don't refer to a clip (here, a video or an image) that hasn't been defined yet. The important thing is that the clip video represents the game footage we're starting with.
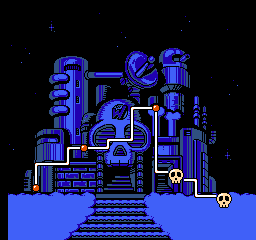
Let's pretend this image is our gameplay video, which we will cleverly refer to as video in our script! Assume it's 256x240, 100 frames long, 30 frames per second, and it's in the RGB32 colorspace (like a Fraps video or Lagarith video might be).

The Layer function: One clip in the same spot over the entirety of another clip[]
Your bread and butter for overlaying in Avisynth is the Layer function. It brings in a second clip and puts it over your first clip, letting you specify where it is with x,y corrdinates, whether you want it fully opaque or somewhat see-through, and other parameters too. For full details, here's [url=http://avisynth.org/mediawiki/Layer]Layer on the Avisynth wiki[/url].
Note that there's a similar function called Overlay in Avisynth, but it's not recommended for a number of reasons. Most pressingly, it does a colorspace conversion on your video, which can degrade your video's quality substantially if you use it many times over. So, stick to Layer.
Say you want our eyebrow-wiggling Dr. Wily from earlier (wily) overlaid onto every single frame of video. You could write a line like this:
video=Layer(video,wily,op="add",level=256,x=0,y=0)
Here's the result:
The operation (op) of "add" at the level of 256 (on a 0-256 scale) puts the image on top of your video in full opacity. This is a good default line for plopping in an image right on top of your video. The x=0 and y=0 put the image at the top left corner of the video - increase or decrease those values to place the image somewhere else. One nifty trick is to use this instead of the previous line:
video=Layer(video,wily,op="add",level=256,x=video.width-wily.width,y=video.height-wily.height)
Here's the result:
Suddenly, he's automatically in the lower right corner of the video! This would work for an image of any size, since the x,y coordinates get calculated for you.
Cutting away to an image, then back to your video - Trim and splice, or use Layer?[]
Say you want to cut away from your video, pop in an image over a couple of seconds, then pick up where you left off. Something like this:
This technically isn't an overlay! It's splicing something new in. You do it with trims and splices. However, people often run into problems here. When you try to splice in an image, like so:
video=video.Trim(0,50)+image.Trim(0,15)+video.Trim(51,0)
That spliced-in image has to match the format of video exactly - width and height, framerate, colorspace, even what kind of audio it has. In other words, you could expect some infuriating error messages while you try to fix it and figure out what property you haven't made match yet. This is where Layer comes in. To solve the problem we're going to create a blank clip that matches our main video's properties exactly (BlankClip(video)), resize the image we want to overlay, then just Layer it on top of that blank clip. That way, our image will already be a perfect match.
boxart=ImageSource("boxart.jpg", pixel_type="RGB32", fps=video.framerate)
boxart=boxart.LanczosResize(video.width,video.height)
#substitute your resize function of choice

boxart=BlankClip(video).Layer(boxart)
#now boxart matches all of video's properties!

video=video.Trim(0,50)+image.Trim(0,15)+video.Trim(51,0)
That should take care of it. If you wanted a clip to pop in and cover up those frames instead of replacing them or inserting new frames, then sure, you can just use Layer, and this next section should explain how to do something like that.
The ApplyRange function: Do a function (like Layer) over a specific range of frames in the clip[]
ApplyRange and Animate on the Avisynth wiki
Sometimes you want an image to appear over a specific set of frames in the movie. Something like this:
One way to do it is to create two versions of your clip: one with Wily in there and one without, then just use Trims and splices to substitute in the frames with the overlay that you want. Say you want Wily to pop in starting at frame 30 then leave at frame 79:
video=AVISource("wilycastle.avi")
videowithwily=video.Layer(wily, op="add", level=256, x=0, y=0)

video=video.Trim(0,29) + videowithwily.Trim(30,79) + video.Trim(80,0)
video
In other words, you want to apply the function Layer only to a specific range of frames. This is where the aptly named ApplyRange function comes in! It will accomplish the same thing as the example above, but often in a simpler fashion. It's especially useful if you're making this kind of edit repeatedly, since it is a one-line function with fewer numbers to type in and potentially mess up.
For another example, the about-to-barf Mega Man sprite with the green face in Example 2 from the video doesn't need to move around or anything, it just needs to be plopped in over some particular frames (after the screen flips out).
A line like the second of these two will handle that:
nauseousmegaman=ImageSource("C:\filepath\megaseizure6.png", fps=60, pixel_type="RGB32")
video=ApplyRange(video, 22011,22100,"Layer", nauseousmegaman, "add", 256, 0, 0)
A rough translation of that above line would be:
video=ApplyRange([base clip], [first frame], [last frame], "Layer" (names the function you want to use), [clip to overlay], [op], [level], [x-coordinate], [y-coordinate]
That line should look a little familiar from above. For ApplyRange (and later, Animate), you can't include things like x= and all that - you just have to provide the values (arguments) in the order the function asks for them by default. Get used to it. You can use ApplyRange for other functions too.
nauseousmegaman is this image:
 And it will be placed over frames 22011 through 22100.
Note all the space around it... For this sprite, I copied a frame out of the unedited movie, pasted it into GIMP, cleared out everything but Mega Man's general region, edited the sprite, then saved the whole image, blank space and all, with as the same dimensions as the original AVI. Leaving the image size at the same size of the video meant I didn't have to worry about changing the x and y coordinates of the Layer function from 0 and 0. That works better sometimes.
And it will be placed over frames 22011 through 22100.
Note all the space around it... For this sprite, I copied a frame out of the unedited movie, pasted it into GIMP, cleared out everything but Mega Man's general region, edited the sprite, then saved the whole image, blank space and all, with as the same dimensions as the original AVI. Leaving the image size at the same size of the video meant I didn't have to worry about changing the x and y coordinates of the Layer function from 0 and 0. That works better sometimes.
But what if you don't want your overlaid image to stand still? Like this here:

The Animate function: make sprites move all around and such[]
ApplyRange and Animate on the Avisynth wiki
The Animate function changes the arguments of some other function dynamically over a range of frames. (It's not limited to Layer - you could say, use it to change hues of your video with the Tweak function, or use it to zoom in on a clip using whatever resizing functions you like.) Anyway, for the overlays I do, that most often means having two sets of x- and y-coordinates - one for where I want the sprite to start and one for where I want the sprite to end up. Then, the Animate function calculates out what the x and y values should be for each frame in the middle and puts the overlaid image in the right spot for each intermediate frame.
Here's what it was with Mega Man rushing in above:
video=Animate(video,1,100,"Layer",\
rush, "add", 256, -700, 180, \
rush, "add", 256, 300, 180)
video
The first line specifies what video we're animating something in, the frames to do it over (1 to 100), and the function to do in quotes. Next, you've got the before and after of the function, Layer, with the only change being in the x-coordinate, so Mega Man flies in from offscreen on the left to offscreen on the right.
Another example of this would be the Quickman lasers I edited into the brief boss room bit in the video's Example 3. (bar is the laser, bossroom is a clip of the room right before the boss.)
bossroom=Animate(bossroom,238,298,"Layer",\
bar, "add", 256, 512, 224, \
bar, "add", 256, 0, 224)
238 and 298 are the first and last frames of the animation. Before and up to the first frame, the laser is 224 pixels down and 512 pixels to the right (which puts it off screen) - the Animate function brings it over to the left frame by frame until it reaches x=0 at frame 298.
Problem with this, though, is that the laser (bar) will stay in that position from frame 298 until the clip bossroom ends. (It also stays at its initial position until frame 238, but since that's offscreen, that's not technically an issue here.) Still, that's no good if you want a sprite to appear, move around, and then disappear, which is usually what I'm going for. One way of handling this is to split the video into three sections and to put the animation over the middle section. For example, something like adding the running Dr. Wily (here, called fear) in the above image running away:
video=video.Trim(0,80)+\
Animate(video,81,100,"Layer",\
fear, "add", 256, video.width-wily.width, video.height-wily.height, \
fear, "add", 256, video.width-wily.width+50, video.height- wily.height).Trim(81,95)+\
video.Trim(96,0)
In short, what the Trim does is make Dr. Wily's running sprite pop in between frames 81 and 95 only, and move him to the right over the course of those frames. Since the x coordinate increases by 50 over the course of 20 frames, he'll move at about 2.5 pixels per second. This is kind of useful to know if you're working on something really specific! Also, I used an ApplyRange to make Dr. Wily's standing sprite appear only for frames 20-80, so then he starts running at frame 81. You can string together bits of animation like this to make some really cool things happen, but that's more or less how it works!
However, for as many times as I do that sort of animation, it gets really annoying to type those Trims and check them over and over for typos. And holy hell, is remembering which number is level, x and y annoying!
Step 3 - Making this all a function to save effort[]
So, I made a function that makes it much easier to do:
Function SliceandAnimate(clip base, clip new, int firstframe, int lastframe, int x1, int y1, int x2, int y2)
{
base=base.Trim(0,-firstframe)++\
Animate(base,firstframe,lastframe,"Layer",\
new, "add", 256, x1, y1, \
new, "add", 256, x2, y2).Trim(firstframe,lastframe)++\
base.Trim(lastframe+1,0)
base
}
"SliceandAnimate" is a crappy name, yes, but it does at least tell me that I'm slicing out the middle of a clip and animating something into there while leaving the clip untouched before firstframe and after lastframe. I supply it with the base clip and the new one to put on top, the frames to put the animation over (firstframe and lastframe), and the x and y coordinates of the place the image should be at the beginning and at the end.
So for good old Dr. Light in the video's Example 1, I wanted him to move from right to left, jump up and open his mouth (light2 instead of light1), then come back down with mouth closed (light1 again) and stay still. Here are the four lines I used for Example 1.
video=SliceandAnimate(video, light1, 41873, 41901, 290,230, 129,210)
video=SliceandAnimate(video, light2, 41902, 41914, 129,210, 119,192) #mouth is open
video=SliceandAnimate(video, light1, 41915, 41927, 119,192, 109,200) #closed again
video=SliceandAnimate(video, light1, 41928, 42136, 109,200, 109,200)
In the last line, the x and y coordinates are the same before and after... I was just being lazy there - I could have used ApplyRange instead to get the same effect of Light just sitting there for frames 41928-42136. Anyway, Dr. Light doesn't move for those frames and instead just sits there and disappears at frame 42137.
Here's an example that puts it all together - the monkeys at the bottom of the pit for the second pit fall gag (Example 4). Here are the images:
![]()
![]()
And here's that chunk of the script! (There are animated arms flying out and such, which I omitted for brevity's sake.)
#monkeys at death 2

monkeyjump=ImageSource("C:\filepath\monkey1.png", fps=60, pixel_type="RGB32")
monkey1=ImageSource("C:\filepath\monkey2.png", fps=60, pixel_type="RGB32")
monkey2=ImageSource("C:\filepath\monkey2.png", fps=60, pixel_type="RGB32").FlipHorizontal()
#this is the same monkey, just flipped over
#you can see how I'm not a stickler for good naming habits

monkey=monkey1.Trim(0,-2)+monkey2.Trim(0,-2)
monkey=monkey.Loop(-1)
#These two lines make a clip of the monkey flipping back and forth rapidly
#(every 2 frames) for pretty much forever

#add one monkey
video=SliceandAnimate(video, monkeyjump, 19457, 19465, 120,240,100,190) #monkey jumps up
video=SliceandAnimate(video, monkeyjump, 19466, 19473, 100,190, 80,194) #monkey lands
video=SliceandAnimate(video, monkey, 19474, 19694, 80,194, 80,194) #monkey attacks

#add another monkey facing the other way and jumping in from the other side
video=SliceandAnimate(video, monkeyjump.FlipHorizontal(), 19459, 19467, 30,240, 50,192)
video=SliceandAnimate(video, monkeyjump.FlipHorizontal(), 19468, 19475, 50,192, 70,196)
video=SliceandAnimate(video, monkey.FlipHorizontal(), 19476, 19694, 70,196, 70,196)
So that about covers it! Here's a better-commented version of the whole script I used for Wily 1 Minimum, for anyone who wants to see everything (including that you clearly do not have to be a good programmer to do this...):
And that script originally was for this video: Wily 1 Minimum Note that in the example script, the function is called SliceandAnimatedOverlay. Rename it anything you like!
And that should cover it. Feel free to let me know if any of this didn't make sense (or did!) or if there's more you want to know. (Also if you have tips for doing it better.)